PayPal subscriptions are simplified and done mostly through PayPal for those who are used to the PayPal interface. In fact, this document is only really necessary for those who want to change a member's status or membership level based on a successful subscription and login. But this document will still help those who don't need that functionality. These basic instructions will work for any
In short, we will be doing the following:
|
STEP
|
|
Enable Auto Return |
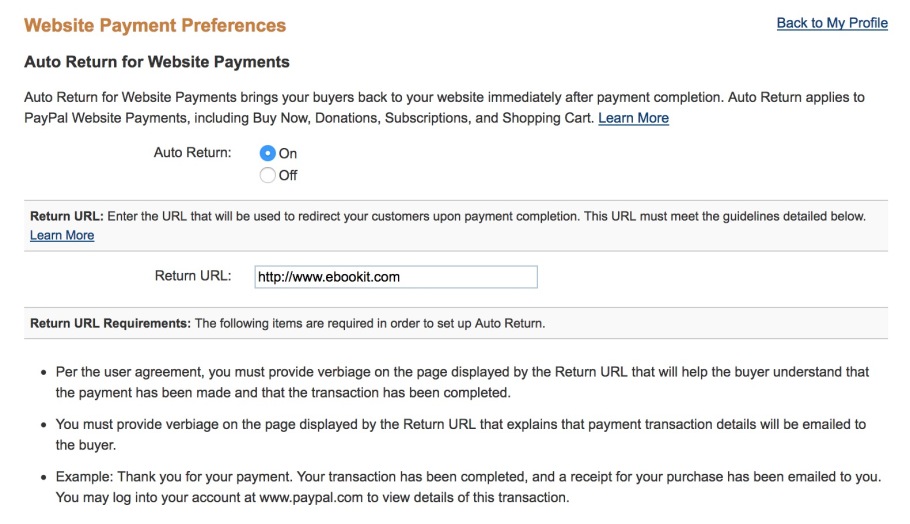
First, you need to make sure you have a PayPal business account, not a personal one, otherwise you cannot create buttons. Consult PayPal documentation if needed for that. Next, you need to make sure the auto return is turned on, otherwise the information cannot be transferred back to your website after the purchase (you would need to change the member's status/level manually).
Auto return is turned off by default. To turn it on...
|
STEP
|
|
Create the Button |
Use PayPal to create your button. You should follow the PayPal's instructions for this. The only thing you need to know for your website integration, is the button finished checkout URL that needs to be entered in Step 3 of PayPal's button creation stage.

Your URL will be
https://[YOUR_DOMAIN]/tools/lp/author?paypalsubscribe=1&status=#&level=#
You will need to replace the "#" signs with the number of your status and/or level. You can get this information either from the "Configure" > "Custom Levels" or "Custom Status'" sections of your Relationship Manager or the "Configure" > "Payment Processor Information" section of your Simple Sell.
Note: This URL overwrites the default return URL you entered earlier, which is what we want to happen.
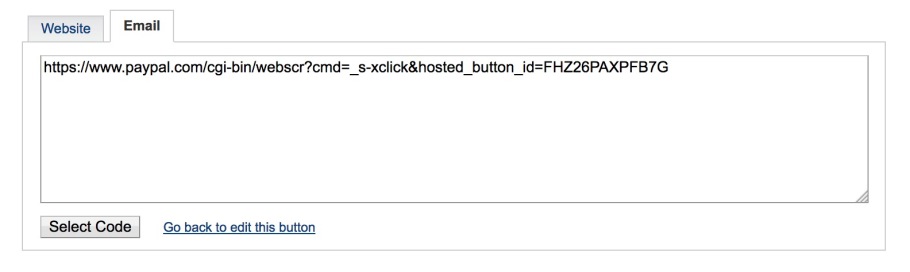
When you "Save Changes," you will be given the button code. Since Your Web Empire does not allow for custom form variables, you need to use the Email link. Copy that. You will need it in the next step.
|
STEP
|
|
Create the Button on Your Website |
This is as easy as creating a link. However, if you want to spice it up, create a button. Use the "Buttons (click to insert)" to the left of the edit window when you are creating a webpage to add a button:
Next, place the cursor at the start of the text, then select the PayPal icon under the "Icons" on the left of the edit window, then click the icon button to insert the icon.
Next, edit your text in the button:
Finally, put your cursor anywhere on the button and click the link icon in the editor, then paste your PayPal button link.
So if you are curious, here is what's going on in this whole process:
Note: There are checks in place on the back end to ensure no foul play.