This document refers to one or more of the options accessible by clicking your "Configure" menu item in your top menu when you are logged on as administrator, then clicking the "Custom Header Image, Domain, Theme, and Menu" and the "Social Media" header items to expand the options.
|
STEP
|
|
Plan How You Want Your Menu To Look |
The top menu is the horizontal menu that extends the width of every tool, and appears right below the header image. The top menu consists of the following components:
The top menu appears different for administrators logged in, members logged in, and the public. For each tool, it is important to see how your menu looks for each of these groups. I suggest you use two browsers (e.g., Firefox and Chrome) where you are logged in through one browser and not in the other.
Here are some sample menus:

This is the public view of a tool with the generic menu button, register, and login buttons.

This is the public view of a tool with the generic menu button, two custom top menu buttons, register, login, and social media icons.
 This is the public view of a tool with the generic menu button, two custom top menu buttons, a tool specific button (for the Simple Sell tool) register and login buttons.

This is the admin view of a tool (custom webpages) with the generic menu, tools, configure, two tool specific admin items, accounts, support, edit user details, logout and home buttons. In addition, the next line has some user account information including what account is being used, the number of sub accounts and the total number of users on the system.
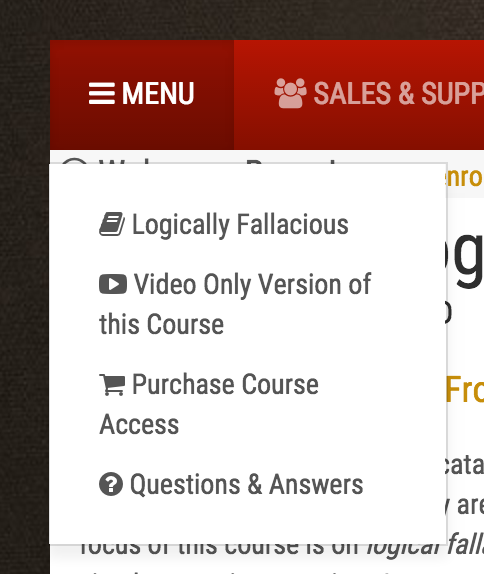
To the right is the expanded "menu" button. You can see that each custom menu item in that menu could have its own icon.
When you plan what you want your top menu to look like, keep in mind the limited space. Again, it is very important to view your menu as administrator, member (if available), and a public users (someone not logged in). This means that when you are logged in as the administrator, you do not see certain buttons, like the custom top menu buttons. This is due to limited space with the addition of the administrator buttons.
Now that you have a general understanding of how the top menu works, we can proceed with the next step.
|
STEP
|
|
Customize Your Generic Menu |
This is done in the "Configure" >> "Custom Header Image, Domain, Theme, and Menu" section.
|
STEP
|
|
Custom Top Menu Items |
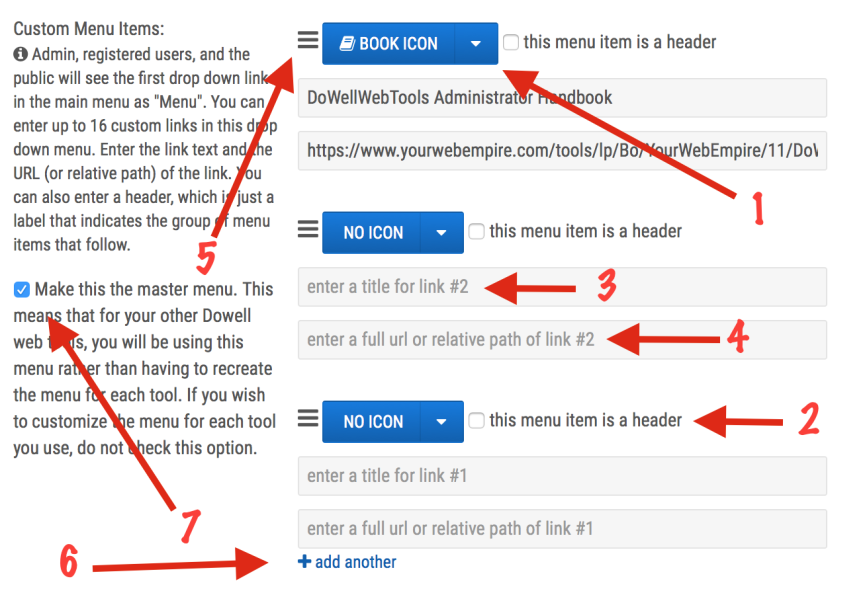
Items can get "lost" in your generic menu, especially if you have many items. If you really want to draw attention to a up to three links, add them as custom top menu items. Again, depending on the length of your item title, your tool you are using, the color theme you have chosen (some themes have different fonts), your use of social media icons, etc., you may not have any room for additional custom top menu items. This is one reason why there is no "master" option for these links... each tool will have its own custom top menu items.
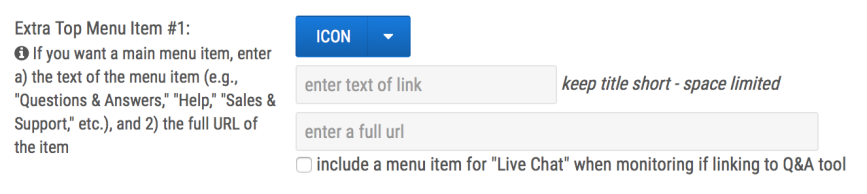
This format is similar to the step above. The only notable difference is the live chat monitoring option. This is discussed in more detail in the Q&A documentation, but you would check this option if you wanted a "live chat" menu item to appear when chat was being monitored.
|
STEP
|
|
Choose Which Social Media Icons To Display |
For all the tools that have a public interface, there is the option in the "Configure" section with the header "Social Media". This is very straight forward—simply enter in the public URLs to your social media sites and those accounts with information filled in will appear in the top menu.