How To Make An Audio Book: A Do-It-Yourself Guide
 Let me say it from the start: making an audio book (or audiobook) is not easy. It takes both technical expertise and talent to produce a professional-quality audiobook that one might buy through Audible or iTunes. However, if you are good with computers, you are a quick learner, and you have a great voice (or access to someone with a great voice), then producing your own audiobook may be a rewarding experience that could save you thousands of dollars. Saving thousands of dollars usually requires investing dozens of hours—even more when you are facing a learning curve. If your time is more valuable than what a service would charge you for professionally producing your audiobook, then use a professional service. If you have the time and the patience but not the money, then read on.
The Tools of the Trade
There are literally millions of possible combinations of hardware and software that you could use to produce an audiobook, so clearly I can't cover them all. In this article, I am going to show you how to create an audiobook on a Mac, using the software and hardware that I have been using. Keep in mind that you should be able to substitute a Windows platform or your own software and hardware fairly easily. The important aspects of creating an audiobook outlined in this article apply to virtually any combination of hardware and software.
Here are the generic tools you need to professionally record your own audiobook:
- A computer with a USB port
- A high-quality microphone with a stand and pop filter (that round cloth thing in front of the mic)
- A way to connect the mic to the computer (either directly via USB or through a mixing board)
- A recording environment with very little to no background noise and no echo
- Recording software
- Editing software
- Audiobook creation software
Here is what I use to create audiobooks and what I will refer to in this article:
- A desktop Mac (circa 2014)
- An XLR microphone with a pop filter and stand
- A USB2 multimixer that connects my XLR mic to the USB port on my computer
- A regular home office (about 20x20 feet) with a carpeted floor
- GarageBand for the MAC (I prefer to use GarageBand '09)
- Audacity (this is great for making sure the sound files meet the technical specifications)
- Audiobook Builder for the MAC
The Technical Requirements
I am using the technical requirements from Audible since they are the primary distributor of audiobooks, and because their requirements help you to create a higher quality audiobook. Below are both audio and image requirements (for the cover). These do not include the requirements for submitting to Audible, just the create of the files. For submission requirements as well, see our page on our audiobook production and distribution service.
Audio Requirements
Image Requirements
- Images must be no smaller than 2400 X 2400 pixels in size.
- The resolution of these images can be no smaller than 72 dpi.
- Images must be squared. The squared cover must be a true squared cover and cannot be rectangular with colored borders on the side. (ex. CD case cover/jacket)
- Images should be at least 24-bit.
- Image types allowed: JPEG, TIFF, PNG
- Images must contain both the name of the title and author(s)
Narrating Your Audiobook
It is tempting to want to narrate your own book. As the author, you know exactly how you want it read: what words to stress, when to sound sarcastic, when to be serious, etc. You may have even been told that you have an excellent voice. Just keep in mind that narrating a book is not the same as singing, casual talking, or public speaking. Reading, whether it be fiction or non-fiction, has an element of acting to it, and nobody likes bad actors. If you believe you can sound authentic in your reading, and if other people agree, then by all means, read away! Otherwise, consider a pro.
Adapting Your Book for Audio
Virtually all books have one or more elements that need to be changed for the audio version. These are usually picked up in the narration process. Some of these include
- References to pages (e.g., "see page 22 for details"). This would need to be changed to something like "this will be discussed in chapter 2".
- Charts and graphs. You might want to leave these out, or describe them to the listener. You can also include them as a .pdf supplement to the audiobook, but very few people actually make use of these. Another option is to refer listeners to a URL.
- Footnotes and references. These make for a very awkward listening experience. Again, perhaps the best strategy is to leave these out and refer the listener to a URL for these references.
- Table of contents. Leave this out.
- Glossary. Leave this out.
- Long lists. Sometimes books include long lists that are not really meant to be read, but just there for effect. For example, a list of all the names of the people who died on the Titanic. You should decide how you want to handle these on a case by case basis.
Not Losing Your Voice
For most people, prolonged and continual talking changes the voice temporarily. Sometimes these changes are subtle and sometimes they are quite noticeable. You don't want your finished recording to sound like you have multiple narrators. It is important for your voice to be consistent throughout the book. This means recording the same general time each day (morning voice is usually different from evening voice) and recording only as long as you can without straining your vocal chords. For me, I am only good for about 2 hours at a time, which means about 2 hours a day for me. Your mileage may vary. You will know where your limit is when you compare the end of one day's recording to the start of the next day's recording.
Making Mistakes
No matter how refined you are, you will make mistakes when narrating. Most of the mistakes you will realize right away, such as stumbling on a word, stressing the wrong word, missing a pause, etc. When you make these mistakes you can either edit in real-time or just repeat the sentence and keep going. I suggest the latter strategy because editing in real-time tends to "mess with your flow," resulting in a final version that sounds choppy and unnatural.
When you make a mistake with the narration, it is important to pause, then go back to the start of the sentence, phrase, or the last verbal pause and start again. Otherwise, the editing process will be a nightmare and you will find you will have to rerecord many sections. Joining two "takes" in a place where there is no pause often results in a distraction where the listener is taken away from the content and shifts focus on the reading. This is what you want to avoid.
Here are some general tips for narration:
- Have warm water nearby and take regular sips, gargling every so often.
- The pop filter should be at least 2 inches away from the mic. If it is too close, it won't be effective.
- Soundproof your recording room as much as possible. This means shutting your door, turning down or turning off any loud HVAC systems (such as air conditioning, fans, heating systems, etc.), not recording when the lawn is being mowed, and politely asking your dog to keep quite while recording is in progress.
- Make sure your mouth is the same distance from the mic each time you record. This distance will vary depending on your recording levels, just make sure it is consistent. You can work with peaks and volume levels in post production, but if they are inconsistent, it will make your job editing far more difficult.
- Find your style and be consistent with it. Some books might require a faster pace, a more somber delivery, high enthusiasm, etc. Remember the style, and stick with it all throughout the recording.
Recording Your Audiobook
My preferred recording software is GarageBand '09 by Apple. It is simple, powerful, and cheap. I prefer the '09 version to the current one because the current version removed many of the podcast/voice recording features for some odd reason. I see no reason one cannot use just Audacity for the recording, editing, and post-production, but I just prefer GarageBand for its ease of use. Again, the general ideas discussed that follow apply to any software.
Chapters, Sections, or Book? How Many Source Files?
If you are working with a relatively small book, let's say under 4 hours of recording, it might make the most sense to just use one source file for the whole book. So you would have one GarageBand file named "mybook" and that would be it. In GarageBand and other recording programs, there are limits to how large a file can be (or how long). These lengths vary. This means that long books require multiple files, which might work best when split by chapters or sections. Long audio source files also become increasingly difficult to work with because of memory. With large files, the editing process can get really annoying, really fast.
Here are some general tips for recording:
- Record in mono, not stereo. Play the recording back through headphones, and make sure the sound is evenly played in both channels.
- Don't use digital vocal effects. If you have a good reason you might want to use some light effects to enhance your voice or the overall sound, but for the vast majority of cases, remove any vocal effects that might be on the track.
- Make sure volume levels are set at 0.0db. When you record at this level, you should have very peaks and the overall sound should be loud enough to so the volume does not have to be all the way up to hear it.
- Save often. You never know when a crash or technical glitch will erase everything you have done prior to your last save, so save your recording often.
Editing Your Audiobook
At this point, you should have all of your recording done in one or more source files. Now comes the editing process. This is where you create the final .mp3 files that will be combined to make up your audiobook. Now is a good time to review the audio technical specs in the section above. In most cases, you will be creating one final .mp3 file for each chapter as well as one file for the opening credits, foreword, dedication, and any other parts of the book.
Listen to the source file and follow along while reading your book. Very often words are skipped and it still sounds fine (I skipped a whole page once). Only by reading along can you pick up these errors. Start your splicing and joining. Always listen to the section after you correct it. Don't just listen for the right words spoken, listen for the smoothness of the edits, proper pronunciation of the words, and proper inflection. Expect that you will have to rerecord several parts of the book. When you come across something that you will need to rerecord, highlight it for later (it's best not to rerecord in real-time).
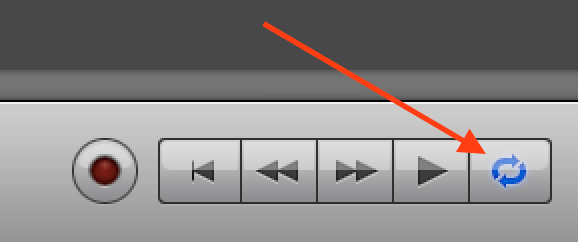 Once the first part of the book is edited, it is time to export that part to its own file. In GarageBand, there is a "cycle region" button at the bottom (see figure to the right). When you click that, a region ruler will appear at the top of GarageBand where you can select the section that you want to export. At this point, don't worry about silence at the start and end of the file. We will take care of that later in Audacity.
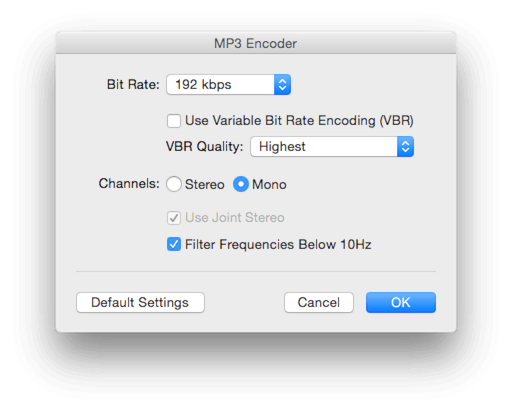
Check that your export settings meet the technical requirements listed above. Here is what I have set for my custom settings in GarageBand:
Be sure to keep your exported files organized in a single folder, and frequently save your edited source file(s). When you are done with this editing process, you should have a folder filled with all parts of the book, sorted by filename starting with 3 digits and an underscore.
Post-Production Editing
GarageBand is good, but not ideal for the kind of professional post-production that Audible requires. Using Audacity (free software for both Windows and MAC), we will
- make sure there is the required silence at the start and end of the files
- Normalize each file (remove peaks over -3dB)
- Set the ID3 tags
Silence!
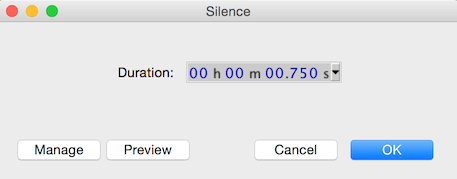
According to the Audible specs, "each uploaded file must have between 0.5 and 1 second of room tone at the head, and between 1 and 5 seconds of room tone at the tail." Whether you plan to distribute this book through Audible or not, this is a very important spec to follow. Shoot for .75 seconds of space at the beginning of the file and 3 seconds at the end. This will give you some "buffer". In Audacity, delete any space at the start of the file and make sure the play bar is at the beginning of the file. In the menu choose "Generate > Silence..." and set the preference to display milliseconds. Set to 75:
Follow the same general procedure, but add 3 seconds to the end of the file.
Normalize
According to the Audible specs, each file must "measure between -23dB and -18dB RMS and have -3dB peak values and a maximum -60dB noise floor." Again, this is good advice even if not using Audible to distribute your audiobook. I am not going to worry about RMS or noise floor here, because if you followed my advice so far, this should be just fine. I will address the peak values, however, because quite often we have some peaks that violate that limit. In Audacity with the entire track selected, go to "Effect >Normalize..." and set the normalize value to -3 then click the "OK" button.

Now you are ready to export the audio as an .mp3 file. Be sure to remember the requirements for constant bit and kbps (192). You will be asked for some ID3 tag information. Enter the name of the chapter/part of the audiobook.
Making Your Audiobook
As of now, what you have are many files that will make up your audiobook, not an actual audiobook. However, many people who listen to audiobooks on their computers would be just fine with a bunch of .mp3 files, so this format is usually offered as an optional format for download. Another format, the M4B format, is designed specifically for audio books and has bookmarking capability, which allows the listener to stop listening to the audio book and later resume listening from the same point, even if the device was shut down. This is the standard for audiobooks.
Creating Your M4B Audiobook
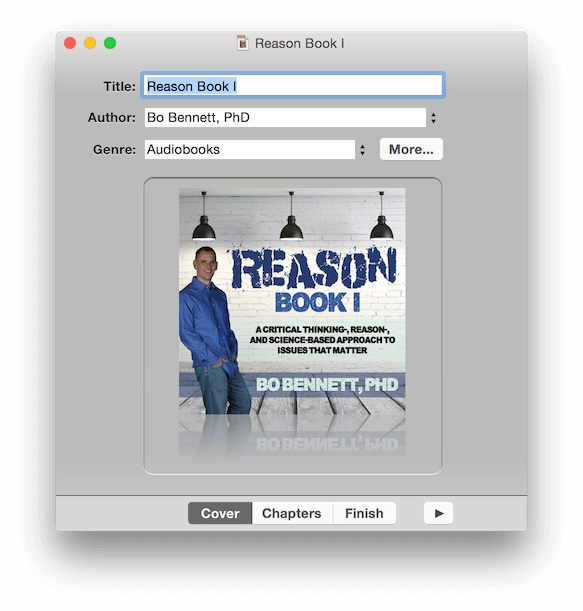
I use the software "Audiobook Builder" available from the Apple App Store. When you create a new audiobook project, you are asked for the title, author, and genre. This is also where you will drag and drop the cover image for this audiobook (review the technical specs above).
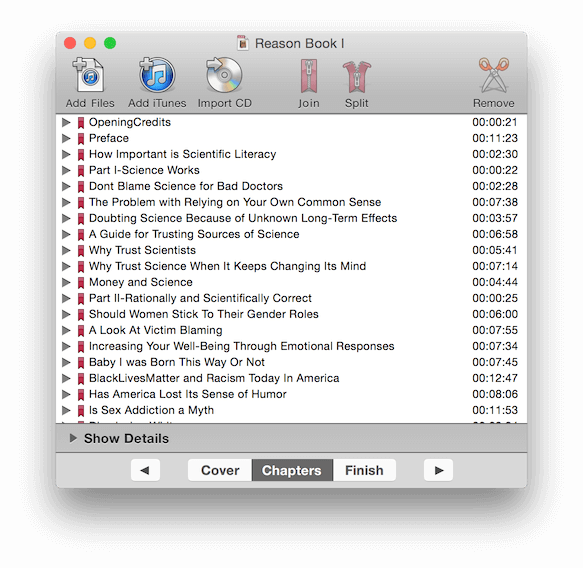
Next, click on the “Chapters” tab, and drag and drop all of your audio files into the white space. You should not have to rename anything if you set the chapter/part names in the ID3 tags, and all the files should be in order as long as you began the filenames with the three digits. Just double check to make sure they are all in order.
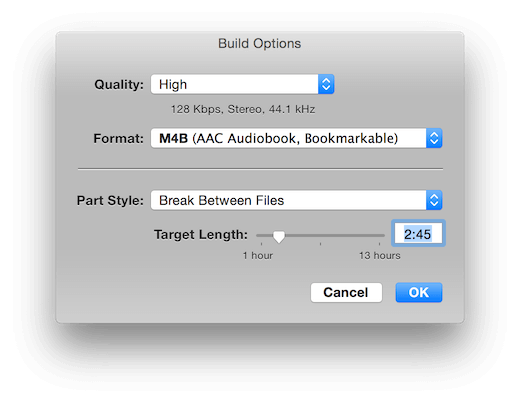
In the final step, click on “Finish” and verify the information and adjust the Build Options. When you click the “Build Options” button you will see a dialog box. You want high quality, M4B files, and break between files. You can adjust the target length so that you each of your M4B files are around equal length. So for example, if you have a total of 5 hours and 12 minutes, 2:45 should be a good target length.
Then click the "build audiobook" button. Within minutes, you will have your completed audiobook. Audiobook builder writes to your iTunes folder by default (if you have one), so you may have to search for the final .m4b files. Now, sync those file to your audiobook playing device and enjoy the fruits of your labor!
Copyright eBookIt.com - https://www.ebookit.com//tools/bg/Bo/eBookIt